Thursday, 11 December 2014

Rain

I attempted to make some rain for the level so as to add some atmosphere to our game slice. It was using the basic particle system on Unity, not using any of the premade water particle prefabs that come with the program.


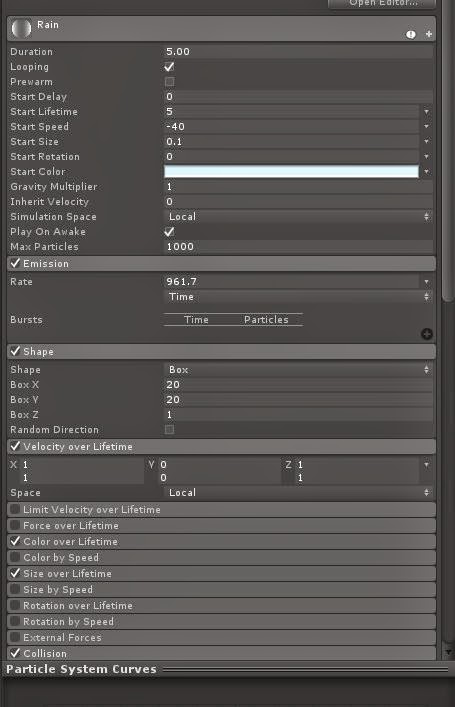
To make the rain I put in a particle system and had it running at -40 for the start speed so that it would go down rather than up. The emission reate is very high so that the rain falls faster and so seems heavier. Also since the rain is spread over a large area there needs to be a faster emission as it's stretched over more space. The velocity over Lifetime allows the rain to fall downwards for a set time before dissipating so as to not use up excess memory by having it fall all the way through the level. 


To make a splash at the bottom I got a particle system and had it going upwards and by making the gravity multiplier at 2, the particles slightly fall back downwards. Also making the start size very small makes it look a bit more like splashes rather than just the large spheres the default size is. By making the shape a cone as well, you can control the shape that the splashes come up in and the radius so the splash looks more natural. It's also set on collision and placed under the rain system so that they only appear when the rain particles hit the ground. 


This is a close up of what the splashes look like on the ground. I think they look ok here, but when the game is played and the player stands in the rain it looks a bit strange as they come up very close to the player and doesn't look right, and so we decided not to use them in game. 


Here is a snapshot of the rain in my practice unity file. I think it looks pretty good with the splashes but like I said above when the player is inside the rain they look a bit strange and so they did not make the final cut. 


This is what the rain looks like in the game. I quite like how it turned out since I haven't used particle systems before and it was interesting to play around with the settings and make the final product. I'd like to explore particle systems more and look at the premade ones and practice making my own, including entering an own made particle image and seeing how it affects the look of different particle systems. 

Tuesday, 9 December 2014

TriggerEnd


The end screen script is definitely where I learnt the most. I was having issues with how the end the game and using GUI texts, but I started using 'RayCast' and two planes as buttons. The RayCast sends a beam between the mouse click and the object and detects whether something is there or not. By placing two planes in front of the player and making them only appear when the trigger is reached, the player can then click and choose whether to restart or quit the game. This is much easier than messing around with GUI texts which have to be completely handled in the script and can cause issues if you want text that is changeable. By using 'hit.collider' and 'RayCast' I was able to make buttons rather than just having the game do something automatically. I had a small problem at the end where the timer wouldn't stop when the player reached the trigger point, but solved that by putting the timer in an 'if' statement and setting a 'GameOver' variable.


When the player reaches the trigger zone two buttons show up, Restart and Exit, and the player can click either, to either play the game again or quit the application. I downloaded a free font to make the buttons and outlined them in white so they could be seen on any colour. The timer also stops when the trigger is reached which sounds obvious but took me a while to work out as I had to use the FindObjectsOfType which was something new that I learnt to like this script with the TimerScript. This coding has definitely been a learning curve for me and was not what I expected to be doing going into the project, however I have learnt a lot of useful things and wouldn't mind doing it again and learning more.

Disappear

This script was the one I had the most problems with and spent a good while trying to work out how to add time to the timer when a pickup was activated. I was trying to add time by adding various scripts to the player and the timerScript, when I needed to add it to the object that was being picked up. I learnt a new line 'GameObject.FindObjectOfType' which will come in really useful in the future. I was unsure on how to reference and call other scripts within a script and this was what I had to do, I was trying to use things like GetComponent which were just not working and far more complicated than this. Also, by adding the public variable of 'Value', it made the script easier to edit in the future by being able to adjust the values in the unity inspector, rather than constantly adjusting the script.

What it does it make it so that anything it is attached to and made the trigger will add time to the timer by the amount specified in the value inspector. It is a key part of the gameplay as our game revolves around running around picking objects up to add more time on so you don't die and have to restart.

Thursday, 4 December 2014

Skybox

I set about making an original Skybox using an online tutorial. I've only ever used the preset Skyboxes that Unity provides so this was really exciting to learn to do. First things first I made the rectangle piece that would serve to be the middle of the skybox and the main pattern.
This was my fist attempt where I thought to use photo clouds taken and stuck together to make a sort of cloud ocean, like fog going up very high. I used this technique of selecting clouds from photos and using the feathering technique and cropping to get the clouds out and still have the fluffy cloud texture. This was a new way of using Photoshop that I haven't done before or knew how to do so it was definitely good to learn even though I didn't end up using this version. 
 I decided that this would be better. I think that the clouds lying separately in the sky and hanging there would look better in the end product rather than having them stretch from side to side and risking difficulties with overlapping and such. This is the first time that I have painted clouds by hand and I think they turned out really well and I'm really happy with how they look. There is a thin line of clouds at the bottom to simulate what I had in the first draft and I used the offset tool to make sure there wouldn't be a seam. I think this looks much better and neater compared to the first one.
This is a version I did with some stars in just to see what it would look like. If we were to go with stars I would add a few more around the rest of the picture and put some on the top cap of the skydome. I actually quite like the look of the stars, I tried to make it look like a far away galaxy. I had a lot of fun making this and would like to try it again with different skies, I may practice a few so I have some stored for future projects. 
Here was my first attempt at creating a skydome. I had a lot of problems and difficulties with this part of the tutorial. I kept getting many issues with stretching, tiling and the UV's in general. I recreated the dome a number of times and retextured it a number of times as well but there was always something that went wrong. In the end I got one that was premade and dropped my own textures onto it. I would like to look over the one I have to see where I went wrong and see how I can improve in the future, however due to time constraints I really needed to use this one. 
This is the final fixed skybox in 3DS Max. As you can see the textures are all in proportion and nothing is stretching, it all turned out much better. It does look like there will be some seams at the top and bottom, I just imported the grabbed imaged into Photoshop and painted over the seams by hand and it looks much neater. I learnt a lot doing this Skybox and I'm glad I did it as I now have the knowledge on how to make them in the future which will come in very useful. 


Here are some pictures of what the Skybox looks like in unity after being assigned to the material. The first is just with the simple grey box model and the second is with the fog that will be covering the floor of the level with a few of the extra buildings but not all. I'm glad the skybox kept it's colour and resolution and it seems to be without any stretching or issues. For my first skybox I'm very happy with how it came out and think I have come out of this well prepared to make another and improve on what I've done here. I also learnt a lot about painting clouds and hope to take that into my regular drawing, not just for skyboxes.