Showing posts with label coding. Show all posts

Wednesday, 15 April 2015

Arlo - Scripts 2


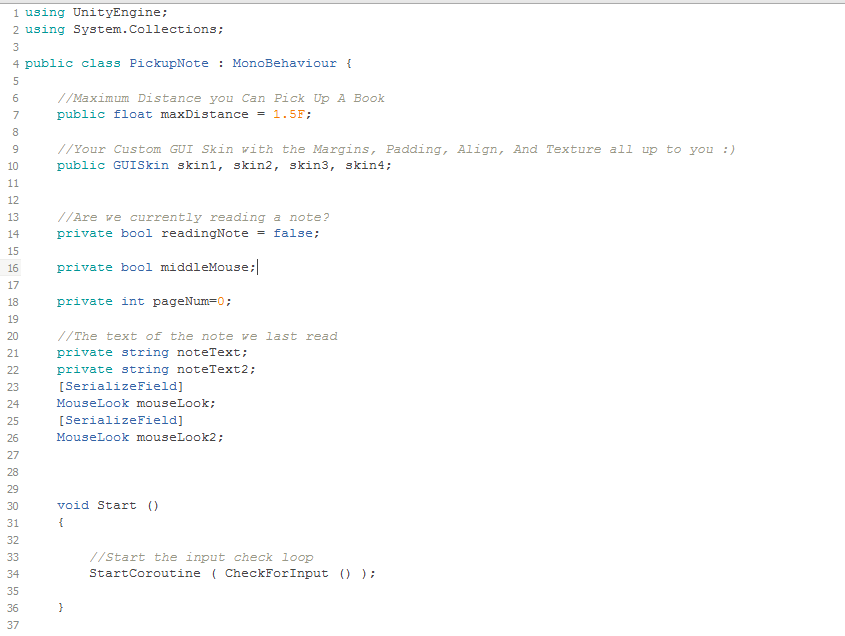
The script for the diary pickup is very long so I split it into 4 parts here. It's using the GUI Style system and took a while to implement. It works by checking for a note on click and running a check for note routine, if reading the note is true which will happen if the mouse is clicked over the object called 'Note', then the GUI will draw the GUI Style onto the screen. The OnGUI shows you which style is going to show up when you click and you set that in the inspector by dragging the style over. The Time.Timescale and mouseLook control whether the player can move or move the camera around whilst reading the note, essentially like a pause. The script is made so when the player clicks it cycles through a series of pictures and then closes when done looking through all of them. 
 Megan created the texture for these note pickups. As you click it starts with the diary page at the back and adds pages on as you click as if you're laying them on top of each other as you look through the diary. 
 Here you can see the diary as it appears in the scene before you pick it up. On the wall is one of a few pictures you can 'pick up' and look at around the house. Sophie made the textures for the child's drawing pictures. The script for this is the same as the one for the diary, only you need to add the section above instead of the note++ bit as you aren't cycling through images but rather picking one up and putting it back down. These two were the hardest of the scripts I had to do and I learnt a lot of scripting stuff doing this. I think for the future I'll learn to use something other than GUI Style as now we have an updated Unity we have access to Canvas. GUI Style is a bit outdated now and also very complicated to use so it will be beneficial to learn something other than GUI Style.

Arlo - Scripts 1

 This is the script that I used to make the bottles smash. We needed to make it so that the bottles would fall apart only when the player controller walked into them. Megan built two separate bottles, one complete one and one that is split into many different polygons. I made it so that when the player enters the collider zone of the bottle the complete one gets switched out for the broken one in the same place. The broken bottle has a box collider and a rigid body on it to make it collapse without falling through the floor.


We have a main menu at the beginning of the game so you can choose to play or exit. The script for this was very simple as it simply involved adding the script to a button and adding a box collider to each button so when it's clicked you load the level selected in the script. The first script there was originally a settings menu and it would allow for the player to go back to the main menu when clicking back. However we decided not to have a settings menu as we have no settings to change and decided to put the instructions on the main page. Sophie drew the instructions and the background is just a screen shot of AJ's room. I made the Arlo heading and the play game and exit buttons.


Tuesday, 9 December 2014

TriggerEnd


The end screen script is definitely where I learnt the most. I was having issues with how the end the game and using GUI texts, but I started using 'RayCast' and two planes as buttons. The RayCast sends a beam between the mouse click and the object and detects whether something is there or not. By placing two planes in front of the player and making them only appear when the trigger is reached, the player can then click and choose whether to restart or quit the game. This is much easier than messing around with GUI texts which have to be completely handled in the script and can cause issues if you want text that is changeable. By using 'hit.collider' and 'RayCast' I was able to make buttons rather than just having the game do something automatically. I had a small problem at the end where the timer wouldn't stop when the player reached the trigger point, but solved that by putting the timer in an 'if' statement and setting a 'GameOver' variable.


When the player reaches the trigger zone two buttons show up, Restart and Exit, and the player can click either, to either play the game again or quit the application. I downloaded a free font to make the buttons and outlined them in white so they could be seen on any colour. The timer also stops when the trigger is reached which sounds obvious but took me a while to work out as I had to use the FindObjectsOfType which was something new that I learnt to like this script with the TimerScript. This coding has definitely been a learning curve for me and was not what I expected to be doing going into the project, however I have learnt a lot of useful things and wouldn't mind doing it again and learning more.

Disappear

This script was the one I had the most problems with and spent a good while trying to work out how to add time to the timer when a pickup was activated. I was trying to add time by adding various scripts to the player and the timerScript, when I needed to add it to the object that was being picked up. I learnt a new line 'GameObject.FindObjectOfType' which will come in really useful in the future. I was unsure on how to reference and call other scripts within a script and this was what I had to do, I was trying to use things like GetComponent which were just not working and far more complicated than this. Also, by adding the public variable of 'Value', it made the script easier to edit in the future by being able to adjust the values in the unity inspector, rather than constantly adjusting the script.

What it does it make it so that anything it is attached to and made the trigger will add time to the timer by the amount specified in the value inspector. It is a key part of the gameplay as our game revolves around running around picking objects up to add more time on so you don't die and have to restart.

Wednesday, 26 November 2014

TimerScript

My job on this task mainly was to do the coding. I have not really coded before so this was all a very new learning experience for me and I have learnt a lot over the course of this.

This timerScript was something I haven't tried before and I learnt about GUI text functions. This script links together with the other scripts and I really learnt how useful 'if' statements are and how they can be used to their full potential. Not shown here I also found out that you can change the colour of a GUI Label by writing ' GUI.color = Color.green; ' in the OnGUI function. By Putting the restSeconds into an 'if' statement with gameOver = false it stops the timer when you reach the trigger zone which was an issue I was having for a while. The timer used to just be in seconds but I found that by putting in the String.Format it allowed me to choose the setting for minutes and seconds and it made for a much neater looking and intuitive timer. 


All the private variables make for a neater looking inspector and allow for me to assign lines of code to them without errors. The one important public variable that's needed is the timeRemaining as it means it can be adjusted in the inspector which is easier than going into the code every time to change the value of the timer. Here I downloaded a custom font so I was able to adjust the size of the font and make it much more readable for the player to see. I think white is the best colour for it as we have quite a dark game and it shows up well in pretty much all of the lighting. I learnt a lot about GUI Texts during this and how to adjust the text so it's much easier to edit and customise, rather than putting all of the information into the script.