Showing posts with label maya. Show all posts

Friday, 24 April 2015

Human Low Res Model - Final Model


I modelled the face, hands and feet separately from the main body and imported them in, it allowed me to make them with proper references and make sure they were in proportion rather than guessing them against the body. I haven't modelled a human head before and it was certainly an experience. I did it by drawing on a square and then extruding and moving around the pieces until it fit the geometry of the face. I only modelled half and then mirrored it so it would be symmetrical. The mouth was the hardest part but I like how the nose turned out. If I model a head again I'd like to find a more economic way of doing it, also perhaps sculpt it and import it rather than building it from scratch in Maya. 


I think relative to the quality of the model I spent too much time on the hands, although I'm glad I used a reference as it meant they turned out looking right rather than how I thought a hand looked. If i could spend more time on it I would focus on making the fingers less square and fix the end of the middle finger. 


The shoes were fairly easy compared to the rest of the model and didn't take as long as some parts to complete. I would have rather made the folds less square but in the time I had I didn't mind leaving it how it is. I did keep having to remind myself that it was a low poly model and shouldn't be too detailed or have to many triangles. 


 The human body I modelled against the turnaround I did for my first project so I'm glad the imaged matched up or it would have been harder. I kept it simple and all in one piece so there weren't too many polys floating around and I couldn't texture it all in one. 


This is how my final model turned out after being posed. He was modelled in the T pose for ease. For my first human model I am pretty pleased, I like how the had and the hands turned out the most. Considering my modelling skill I probably shouldn't have done a human and done a weapon or environment instead but I'm glad I tried it and pushed myself to do something I wasn't confident in. Next time I model a human I'd like to try it in a sculpting software like Z-Brush instead to see how different it is and have a go at high poly modelling. 

Human Low Res Model - Textures


This is the main texture for my model which contains the whole body part. I unwrapped it by selecting the front part of a section and the back part, unfolding them and then connecting them together to create the unfolded section. I tried to mostly connect them where the seam would be in the clothes and underneath so they wouldn't be seen.


 I have two textures for the face as I had some difficulty with the unwrapping and I somehow ended up with two UV maps on everything on the head. I wasted a lot of time trying to fix it before finally fixing it. I found the face awkward to texture as it was a lot of trial and error to work out where things were so they could be shaded properly. 


These are supplementary textures of the hat, shoes, hair and hands. They weren't very complicated and didn't require much shading or I didn't have enough time to do it the way I wanted, which is the case with the hat and hands. 

Human Low Res Model - Renders


These are the final renders I did of my model. I put a small colour behind them so the model wouldn't blend in so much with the background. The colours are a bit pale but I couldn't work out how to fix it without getting rid of the shadow. I decided I would rather have the shadows as I don't think the lighter colours look too bad. 

Human Low Res Model - Sketchbook Studies


These are some sketchbook studies of human anatomy and poses I did to prepare for the modelling. It helped to practice these so when it came to the modelling I could hopefully keep it relatively in proportion. 

Wednesday, 15 April 2015

Mum Rig and Animation


For the model of the Mum, Amber modeled her but I did the rig and this one as well as animating it. This is the first time I've ever rigged anything and I had no idea how or where to start so I looked up a tutorial online to follow. I did switch tutorials halfway through so it got a bit confusing towards the end but I know a bit more for next time and I think I could do a better job then. The easiest bit was definitely drawing the skeleton in and it was ok attaching the various IKs to the model to help it more like a real person. What I found the hardest was after when the skeleton was bound to the model and I needed to paint in the effect of the joints of other parts of the body to make sure there was no warping in the mesh. The tutorial I followed put particular detail into the foot so I may look into doing that again to practice and although it has no used in this project the model is able to go on her tip toes and the balls of her feet as well as move them independently. It is definitely a little bit of a shoddy job but I enjoyed learning this part as since I'm interested in animation it would be bad not to look into the rigging and how the animation can actually work.
 Here you can see how the model bends at the knees and that the IKs are attached between the ankle and the hip.There isn't much warping around the leg area and you can see how the toes bend separately from the feet.
 
 Here is the position the model will stay in during the animations. She was difficult to animate as the rig was a little hard to get used to and use. If I'd had time I think I would have re rigged her with the new knowledge I had of how to rig something. I would like to experiment with rigs in the future and learn how to do it much better. It was a fun part of the project, but I think one of the animations I did didn't export properly and so doesn't look quite right in the games, however there wasn't time to fix it.


AJ Animation

Amber modeled AJ and rigged him then sent him to me to animate. Animation is something that I have been interested in and this game project is the second time I will have animated something in Maya. It was definitely a learning curve animation something that wasn't a walk sequence with any reference behind it to look at. The final animation was the fourth time or so I had attempted to animate it due to issues with the program and files and we had a few problems putting the texture on him after he was animated as the animation had warped the UV map. However we fixed this and so the texture shows little to no warping anymore. I would definitely like to practice animation more and would like to look into doing more animations for third person characters. I will also look into getting more references to learn from and how bodies look in motion so as to make them as natural as possible. I wish I could have used one of the first animations I did for him as I think one of them looked better, however in the time and the fact that I was redoing it was wasting time and I needed to get on with other things.

Textures

 Although I did a fair bit of modeling I really didn't do that much texturing. It's not one of my strong points although I should probably use that as a reason to practice and get better. I'm very slow at it and it takes me a while to do simple textures. I did texture the dining room table, it was the first thing I've textured in a while and so I'm kind of happy with it. It was difficult trying to reproduce the wood texture as we made most of our own textures ourselves to give a slightly stylised look. I have to learn that although something may not look amazing by itself when texturing I need to look at it as a whole and actually on the model as it may look better than I think.
 Moe originally textured this sofa in plain colours but thought some of the pillows should have patterns on them or I think it would have looked a bit plain. I chose two relatively quick patterns to do so as to not waste time and although it's a small part I think it added to the sofa a bit. We have a red theme for the living room so I tried to stick to red but not so much that it became overwhelming.
This is the texture I think I'm pretty pleased with as I did draw it myself rather than just using a picture and overlaying it.We thought it would be fun to have something on the TV rather than just a black screen. Although I didn't do much texturing I'm happy with the work I did, but I think I can still improve especially with unwrapping and sorting out UV's. I can also improve on my time spent on texturing as I waste a lot of time being so slow at it.

Arlo - Models 3


This is the first of the little bits to put around I made, I used Apple Mac dimensions to model off and used the insert edge loop tool and extrude options to make the keyboard and track pad. It was pretty easy to do and I like how it turned out. 
This was the beginning of a magazine I started making that could have been placed around. I was thinking whether to model more pages or to just texture them in. Either way I ran out of time and didn't manage to finish making it before the game hand in. I do think it could have turned out well though as I do like how it was shaping up. I used the mirror tool so the sides would be even rather than modeling each side differently.

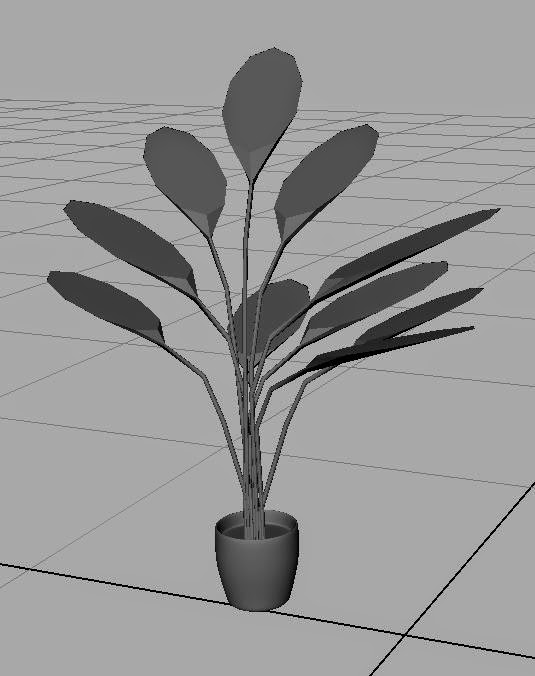
This plant was the first organic thing that I have modeled. Doing a plant was much harder than any object I modeled for this project and I spent a while thinking about how to do it. It does perhaps look a little messy but I like how it looks for my first plant. I'd like to make some more so I can practice foliage as natural modeling is something I've never looked in to. 
This fruit bowl was the last random piece that I made for the house, it was pretty fun although most of the shapes are just spheres. I liked making the bananas and if I'd had time I probably would have put more diverse fruit in it rather than just round ones.

Arlo - Models 2

 These are a desk and chair I modeled for AJ's room. The desk is also used in the bother's room but stretched out a little, and the chair is also used in the basement for the mother to sit on. For the chair I decided to do one of those cheap fold up chairs as I thought it would be interesting to model and would fit better in our scene than a bigger chair, because of the way the room is layed out there isn't much room behind the desk for a chair. The desk was pretty fun to do and I like how the drawers and the handles turned out. The model's geometry is a bit messy but it didn't impact the texturing so it didn't matter so much, but I will aim to make my models much neater in the future to make it easier.
 This is just a simple round table that can be placed around the house to put bits on. It was fun making a round table as all the tables I've modeled so far have been square.
This lamp is the last main piece of furniture I made and I wanted to choose a lamp with an interesting stand. The lamp itself was pretty easy to model but the curved bit around the circle was quite hard as I couldn't find a natural way to do it other than just curve it manually around bit by bit. It was also the hardest bit to unwrap but it turned out ok in the end.

Arlo - Models 1

I made a sofa and a chair for the living room, the chair is just the sofa but shrunk down so I wouldn't have to model it twice and so they looked like they were from the same furniture set. I modeled the base of the sofa first, extruding and stretching out, then modeled the pillows and the feet separately and combined them after I was finished. To make it look rounder I used the smoothing option and converted the smooth mesh to polys. Although it looks nice this gave me a lot of problems when texturing and so I won't rely on it so much in the future to make the models look smooth. I did find though that if the model was unwrapped and textured first and then smoothed the model retained it's UV map and still was able to be smoothed so I might test that out later on. I'm quite pleased with how they look and think my object modeling is getting better. 

 This is a coffee table that is also meant for living room. It's quite simple but does the job and I don't think I'd change it.
 Here is the dining room chair and table I made to go between the living room and the kitchen, at the bottom of the stairs. I wanted them to be simple but still look nice as they will go in the middle of the house and the player has to walk past them quite frequently. I wanted to choose chairs that looked modern but still fit with a lot of the wood items we are planning to have in the house. I'm glad how the table turned out, even though it was simple, I looked up the measurements of a real table and chairs so everything would be in proportion. I'm quite pleased with this set of models and I think they hold up pretty well with the standard of the rest of the house.